Resources
Employee discounts are available for personal cell phones through AT&T and Verizon. Both use email for verification. View supporting web pages for details.
- Cell Phone Stipend Request (work related)
Abbreviated or Speed Dialing - Allows a telephone user to either dial an abbreviated dialing access code list number or press a button on a multiple line telephone to dial frequently called telephone numbers.
Automatic Callback - Allows a user the capability of having the telephone system redial a busy telephone number. The system will call back the user first then connect the busy party. Will not work if the extension has call coverage assigned to it.
Call Coverage - Forwards a telephone extension to a predetermined coverage path.
Call Forward Follow Me - Forwards all telephone calls of an extension to a telephone number of the individuals choice.
Call Pickup - Provides the capability of answering telephone calls of extensions in your call pickup group.
Last Number Dialed - Automatically redials the last telephone number dialed.
Malicious Call Trace - Provides the capability of tracing malicious telephone calls.
Priority Calling - Allows a caller to use a distinctive three-burst ringing when placing an important internal telephone call. Provides the capability of overriding send all calls to ring a telephone in send all calls.
Send All Calls - Immediately forwards all telephone calls to the predetermined coverage points.
Single Line Phones
Hold
- Place Call On Hold
- Press the SWITCH HOOK Button (Do Not Hang Up).
You will hear a dial tone, Intercept Tone or Silence.
- Press the SWITCH HOOK Button (Do Not Hang Up).
- Return To Call
- Press the SWITCH HOOK Button
Transfer
- Press the SWITCH HOOK Button
- Dial Number
- Announce Call
- Hang Up
Conference (Add a 3rd Party)
- Press the SWITCH HOOK Button
- Dial Number
- Wait for party to answer
- Press the SWITCH HOOK Button
Abbreviated Dialing
- Dial #4
- Dial Index Number
- Wait for party to answer
- Press the SWITCH HOOK Button
Multi-Line Phones
General Information
- Indicator Lights When You Have A Message
- Dial extension number of message center group for messages
Abbreviated Dialing
- Access
- Press the AD Button
- Program
- Press the ABRV DIAL PROGRAM Button - Green Lamp Lights
- Press the AD Button - Green Lamp Lights
- Dial Number (Up to 20 digits)
- Press the AD Button - Green Lamp Goes Dark
- Hear Confirmation (3 Short Tones)
- Press the ABRV DIAL PROGRAM Button - Green Lamp Goes Dark
Abbreviated Dialing Short
- Access
- Press the ADS Button
- Program
- Press the ABRV DIAL PROGRAM Button - Green Lamp Lights
- Press the ADS Button - Green Lamp Lights
- Dial Number (Up to 4 digits)
- Press the ADS Button - Green Lamp Goes Dark
- Hear Confirmation (3 Short Tones)
- Press the ABRV DIAL PROGRAM Button - Green Lamp Goes Dark
Automatic Callback
- Activate
- Press the AUTOMATIC CALLBACK Button When Busy Tone Is Heard
- Hear Confirmation (3 Short Tones)
- Hang Up Immediately
- Cancel
- Press the AUTOMATIC CALLBACK Button
- Hear Confirmation (3 Short Tones)
Call Forwarding Follow Me
- Activate
- Press the CALL FOWARD Button - Green Lamp Lights
- Dial Extension Number
- Hear Confirmation (3 Short Tones)
- Cancel
- Press the CALL FORWARD Button - Green Lamp Goes Dark
- Hear Confirmation (3 Short Tones)
Leave Word Calling
- To Activate When Call Is Not Answered Or Coverage Tone Is Heard
- Press the LEAVE WORD CALLING Button - Green Lamp Lights Until You Hang Up
- Hear Confirmation (3 Short Tones)
- To Activate After Call Is Answered
- Press the LEAVE WORD CALLING Button - Green Lamp Lights Until You Hang Up
- To Activate Before Dialing
- Press the LEAVE WORD CALLING Button - Green Lamp Lights
- Dial Extension Number
- Hear Confirmation (3 Short Tones)
- Cancel
- Press the CANCEL LEAVE WORD Button
- Dial Extension Number Of Called Party
- Hear Confirmation (3 Short Tones)
Print Messages
- Press the PRINT MESSAGES Button
- Dial Own Extension Number
- Hear Confirmation (3 Short Tones)
Priority Calling
- Press the PRIORITY CALL Button
- Dial Extension Number
Send All Calls
- Activate
- Press the SEND ALL CALLS Button - Green Lamp Lights
- Cancel
- Press the SEND ALL CALLS Button - Green Lamp Goes Dark
Feature Access Codes
The features below can be used simply by dialing a "feature access code" and do not require a special button on your phone. To use the access codes, simply lift the receiver off-hook or activate the speakerphone, then dial as described below.
| Feature | Access Code |
|---|---|
| Abbreviated Dialing | #4 + (list entry to call) |
| Automatic Callback Activation | *5 + (phone number to call) |
| Automatic Callback Deactivation | #5 |
| Call Forwarding Activation | *2 + 9 + (10-digit destination phone number) |
| *2 + (4-digit destination phone number) | |
| Call Forwarding Deactivation | #2 |
| Priority Calling | *1 + (phone number to call) |
| Redial Last Number | #9 |
| Send All Calls Activation | *3 |
| Send All Calls Deactivation | #3 |
Voicemail Guides
Helpful Hints
- BloomU Voicemail system: 570-389-5300
Call this number to retrieve or send messages from any touch tone telephone anywhere in the US. - Message Waiting Lamp will light when you have a new message.
- Mailbox size: The total amount of storage for you is 20 minutes. Remember that the storage amount is used up by all messages received and sent as well as your Greeting.
Retention time: New, unopened, old and filed messages will be kept for 15 days. - Emptying of mailboxes is the responsibility of each user. The system will notify you when you have reached 50% capacity.
- Vacations: It is recommended that you leave the name and number of the person covering your work at your absence. You could use the transfer command in your Greeting.
- Message scanning will use FIFO (First In First Out) method. When retrieving your message, the oldest message will be the first one heard.
- When calling another Audix user, you don't have to listen to their greeting. Just press 1 when you hear their Greeting and record your message.
- When you leave a message for another Audix user after being send to their Audix Mailbox, you can rewind (23) and listen to your message, as well as delete it(*D) and record another message.
- To check more than one Mailbox for voice mail, while logging-in, press **7 and the next extension number of the next Mailbox you wish to check, and the correct password for that Mailbox.
Logging In For The First Time
To access your mailbox from your office extension:
Press the Voicemail button or dial 5300
Enter your first time password followed by a #
Contact Telecommunications for password
To access your mailbox from the office extension of someone else who has a mailbox on the system:
- Press the Voicemail button, or dial 5300
- Press *, followed by #
- Enter your mailbox number
- Enter your password, followed by #
To access your mailbox from the extension of someone else who has no mailbox on the system or from outside your organization:
- Dial your voice mail access number 5300
- Press #
- Enter your mailbox extension number
- Enter your password, followed by #
Recording Name and Personal Greeting
To record your name:
- Press 5-5, speak your name only
- Press 1
- Press # to approve or 1 to re-record
To record a personal greeting:
- Press 3-1-1, record your personal greeting
- Some professional greetings include:
- "Hello, this is (your name). I'm away from my desk right now, but please leave a detailed message after the tone and I'll return your call as soon as possible. If you need help while leaving this message, press star four. Thank you."
- "Hello, this is (your name). I'm in a meeting this afternoon, Tuesday, March 23. Please leave a detailed message after the tone and I'll return your call after four o'clock. If you need help while leaving this message, press star four. Thank you."
- "Hello, this is (your name). I'm either on the phone or away from my desk right now. Please leave a detailed message and I'll return your call as soon as I can. If you need help while leaving this message, press star four. Thank you."
- Press # to approve
Logging Off
You exit your mailbox by pressing **9. You will hear the system say “Goodbye.”
Important: Don’t hang up while listening to a message. Press **9 instead. Otherwise, you can tie up a voice port for some time, reducing the number of voice ports available for others to access the system.
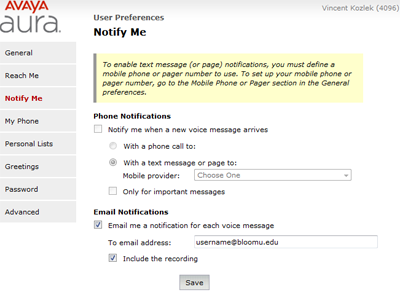
Setting up your voicemail online
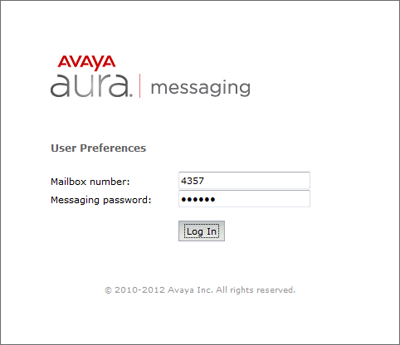
You may access your voicemail user preferences by reviewing this guide for accessing your voicemail.
Enter your phone extension as the "Mailbox number", your voicemail password as the "Messaging password", and then click "Log In".
Use the Web Client Guide if you need assistance navigating around the preferences.
Please note, the voicemail system upgrade that took place during the Spring 2014 semester removed the ability to access voicemails directly in your web browser, however there is now an option to have voicemails forwarded to your email account immediately as they are left for you. To enable this option after you log in, simply click the "Notify Me" tab on the left side and then select the "Email me a notification for each voice message" checkbox, enter your email address, select the "Include the recording" checkbox, and then click "Save."